Bathroom Refresh
Hi everyone! Today I'm SO excited to share my finished bathroom! This is one of those projects that I wanted to do since we moved in- I never liked how our bathroom looked, but it always got pushed aside. I figured that since I'm always home now it would be the perfect time to finally tackle this room, and I'm so glad that I did- this quickly went from my least favorite room in the house to one of my favorites! Plus- I was able to do everything for under $200. Let's see what I did! (ps- if you want to see the other projects I've done in quarantine check out this post!)
First I want to share some of my inspiration pics- I used these to imagine what I wanted and what might not look good in a small space. While I didn't copy these exactly, I used bits and pieces from each to inspire my vision! Here are the images that I took inspiration from-


To start out, let me share the "before". This is after I did a few minor decorations and we also removed the original window and shade to put in a frosted glass window to provide more natural light-


Ew, right? Pretty far from my inspiration pics.
Once I had a plan in mind, the first step was cleaning everything thoroughly, then repainting the baseboards white. This was a really easy step, but already made such a huge difference. It really brightened up the whole space! I also decided to repaint our mirror white- the wooden frame just wouldn't cut it. I used the same white paint on some plain wooden shelves that I got on Amazon- they had a bunch of different colors but I wanted a crisp white. Finally- I spray painted our rusty vent a glossy black- since the walls were so dark I thought this would help disguise the vent and it looked AMAZING.

Next up, I repainted the ugly brown walls (pro life tip- don't paint a bathroom brown) a deep slate gray/blue called Gibraltar by Sherwin Williams. This was an easy pick for me- it's in the same family as my living room (Morning Fog) and office (Olympus White). Since this room gets a ton of natural light, I wanted to go bold with a dark color and love how this turned out. I had Dan help me move out the sink, take down all of the towel racks/toilet paper holder, and patch any holes. There was also a big patching job I had to do behind the sink, where we previously had to rip off some caulking that pulled off some of the paint and exposed the drywall (you might notice a little white patch in the "before" behind the faucet). So much better now!

After the walls were done, I had my biggest task- the floors. After seeing peel-and-stick tiles pop up constantly on Youtube, TikTok, and Instagram, I decided to try them out. These are much easier to use than traditional tile (plus a lot cheaper). Since our bathroom is pretty tiny, there were a lot of small cuts I had to make. I took this step really slowly and made sure to line everything up as closely as possible. This is definitely not perfect- I had a few gaps and tiles that didn't line up perfectly, but I knew I could touch this up later.

To finish off the floors and make it look more professional, we decided to add in some quarter round on the baseboards. This helped to disguise any tiles that didn't hit flush with the baseboards, and also make everything look better! Dan helped me cut these and install them, then I went in to cover the nail holes and caulk all the gaps. I repainted these and the baseboards to make them look completely seamless. (pic below is before I did those steps in case you notice any gaps!)

My last step was to accessorize! I got some marble pieces (a tray for the top of our toilet, a cup for cotton rounds or Q-tips, and a hand soap pump) at Home Goods, as well as a frame for a watercolor sign that I made. I also installed the shelves and decorated them, and got a new bath mat and shower curtain. Since we took down the towel rack above the toilet (which always grossed me out!) and moved it behind the door, I decided to make a quick art piece to go there. I spray painted an old canvas with the same black paint I used on the vent, then taped off a section and filled it in with some spackling to make a cool texture. I love how it turned out, and it was really simple and cheap to make- using materials I already had on hand.

I also decided to reorganize my bathroom cabinet- getting some organizational bins from Home Goods and cleaning off the shelves. Half of them didn't have liners (but the previous owners left us a roll) so I finished that up and love how much better this looks! And with this- the entire makeover was DONE.
Before..no organization and everything just thrown in-

and After! Might not seem like a big difference in photos (the closet sits right in the doorway so it's hard to get a good pic) but in person it's soooo much better.


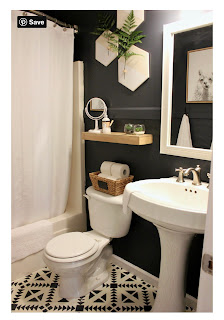
Here's the final before (when we first looked at the house) and after- I hope you like this just as much as I do! It was a pretty simple job since we didn't replace or move anything, and I think makes a HUGE difference. Now it's on to my next project.....


Oh, I love it. That fake tile looks great.
ReplyDelete