One Month in the Garden
Happy Friday everyone! I have a fun post to share today- an update on my vegetable garden! We started planning this back in March, and really got working in April. Along the way I've learned a lot but am still making mistakes and adapting as I go. Here's how we started, and what our current status is!


This is one of those areas that we learned on the go! We planted our tomato and pepper plants this past weekend (since it's finally warm enough) and built supports for them. We're trying a few different methods to see which works best, so I'll be sure to give updates. One thing that we messed up though is adding trellises for some of the veggies we already planted and were just starting to grow (like our beans and cucumbers).

We might have sacrificed a few with the structures, and also have the supports a bit far away for some of the plants. Next year we'll make sure these are in place well before we start our seeds! While we did this, we also added a layer of mulch around the plants that were already sprouted. This helps to warm up the soil, minimize weeds, and converse moisture for the plants. Plus, it just looks a lot nicer!

Pick out location for garden
 |
| How it all began... |
In our backyard, we had three huge trees that fell down two years ago. Once we cleared them, we decided to re-do that section of our yard to make a fire pit (mostly to burn all of the wood that we chopped down) and create our garden! This area is the flattest area of our yard and also gets unobstructed sunlight for most of the day.
 |
| Shortened the fence line, added a gate, and now we have extra yard! |
Our first step after figuring out where we wanted to plant was to decide on a layout! We chose to make two 10'x4' raised beds, with a 2' path in between. We marked these off, checked with 811 to make sure we wouldn't hit any utility lines, and dug out all of the grass for a clean slate.
Build raised beds
Since our soil doesn't have good drainage and is a clay texture, we knew we wanted to do raised beds. There are millions of ways to build these (or just plant straight into the ground if you're luckier than us...or willing to put in effort to improve the soil). We decided on a simple box design, reinforced in the middle to prevent bowing. Once they were both built, we put them in place and made them as level as possible!
Our next step was to fill them up- we went with a mix of top soil, compost, and mushroom manure that we ordered from a local company. Definitely a workout to fill them up since we got over a yard of each! We also marked off every square foot to help with our plans (more below!)
Plant your seeds (or transplants)
There's too many intricacies about planting zones, frost dates, and more to talk about in a quick blog post (I recommend checking out Rodale's Ultimate Encyclopedia of Organic Gardening and talking to gardeners at your local nursery). But- the advice that I was given was to plant your favorite vegetables and herbs. For me, this was radish, spinach, arugula, cabbage, beets, zucchini, hot and sweet peppers, tomatoes, celery, cucumbers, beans, peas, onions, basil, rosemary, sage, lavender, mint, cilantro, dill, and chives.
 |
| The original plan! |
We decided on using a square foot method to plant, which means creating a 1'x1' grid in each bed. Each box in the grid is assigned a plant. Some plants like tomatoes need a lot of room, so only one tomato plant would go in each square. Others can be planted close together, like radish, so you can plant about 16 in one square! All of the spacing information can be found on seed packets or on the transplant tag, along with information on watering and sun needs. When planning our grid, we also mapped out which plants do well beside eachother, and which would compete for space and resources.
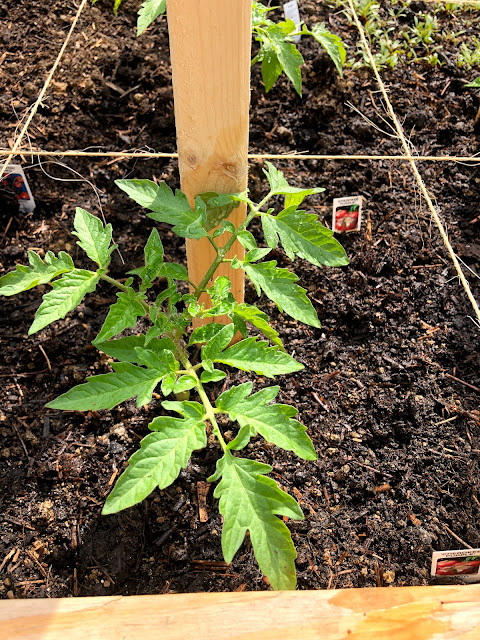 |
| Tomato plant from Soergal's! |
Once we had all of this figured out and put in an excel spreadsheet, we got to planting. We figured out if any plants needed fertilizer, and mixed that in with the soil first. Since we started pretty late in the year, we did a mix of seeds and transplants from our local nursery. Some seeds, like peppers and zucchini, I was able to start indoors and will transplant myself when it gets later in the season! Hopefully next year I can start earlier and do even more plants from seeds. Once everything was in, we made sure to give everything a nice shower, and excitedly waited for the first sprouts.
Watch your veggies grow!
 |
| A tip I learned was to write the type and date when you plant everything |
This is the phase that we're in now! I go out to our garden every morning and check if the plants need watered or thinned, and also check for pests. There are also some plants that we're seeding for a second time (such as arugula, radish, and cucumber) to make sure we have a continuous harvest. I love checking on my little baby plants and get excited every time I see a new one sprout up.
Add support structures for plants
We still have a long way to go- adding a fence around, making a little gardening box for my tools, routing the hose or making an irrigation system, and some landscaping. So far, I'm really happy with this little space and proud of everything we did! Crazy to think we went from the picture at the top of the post to this (quick picture I took yesterday after we finished the corner landscape) in the matter of a year- all by ourselves!
Do you have a garden? Do you have any tips???
What does your dream garden/backyard look like?


Comments
Post a Comment